Dictation
Dictation is the core feature of dIKta.me, designed to convert your voice into highly accurate, perfectly formatted text injected directly into any application.
This guide covers the primary dictation modes. For editing existing text with instructions, see the [Refine](refine.md) guide.
How It Works
At a high level, the standard dictation pipeline follows these steps:
- Record: You press the dictation hotkey, and dIKta.me captures your voice.
- Transcribe (STT): The audio is sent to your AI Speech-to-Text provider (like Deepgram or Whisper) to turn it into raw text.
- Process (LLM): The raw text is passed to an AI Language Model (like Gemini or OpenAI) using your custom System Prompt to format, punctuate, or rewrite the text.
- Inject: The final polished text is injected into the active window at your cursor position, instantly.
Because dIKta.me uses your clipboard to paste the text rapidly, it temporarily saves your existing clipboard contents, pastes the dictation, and then seamlessly restores your clipboard.
Starting a Dictation
To start dictating, place your cursor wherever you want to type (e.g., MS Word, a web browser, Slack) and press the Dictate hotkey:
Ctrl + Alt + D (Default)
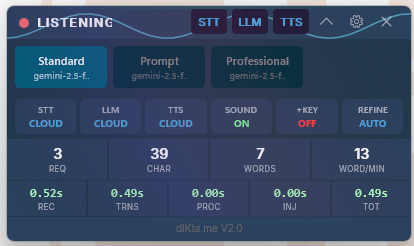
The Control Panel HUD will change to show it is Recording. When you are finished speaking, release the hotkey (if using Hold-To-Talk) or press the hotkey again to stop. Once processing is complete, the text will appear.
Input: Voice · Hotkey: Ctrl+Alt+D
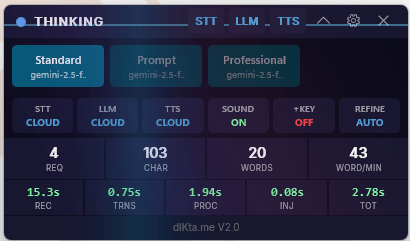
While the AI processes your words, the Control Panel shifts to Thinking:
Streaming vs. Batch Dictation
dIKta.me offers two distinct ways to transcribe your voice, depending on your selected STT provider and settings.
1. Batch Dictation (Default)
In Batch mode, dIKta.me waits until you have finished speaking and pressed "Stop" before sending the audio to the STT provider.
- Pros: Allows for LLM Processing. You can apply highly specific prompts (like "Rewrite this to sound like a pirate" or "Format into a bulleted list") because the AI has the complete sentence context before rewriting.
- Cons: Slower time-to-text, as you must wait for the recording to finish before the processing begins.
2. Streaming Dictation
In Streaming mode, your audio is sent to the STT provider (currently supported by Deepgram) in real-time, chunk by chunk over a WebSocket. As you speak, the words appear on your screen almost instantly.
- Pros: Extremely fast, real-time feedback.
- Cons: Because the words are injected as you say them, Streaming Dictation bypasses LLM Processing entirely (Raw Mode). You cannot use system formatting prompts while streaming.
You can enable streaming explicitly in Settings -> General if your active provider supports it.
Injection Settings
dIKta.me allows you to customize how the text lands in your application. In the Settings window (General tab), you can configure:
- Trailing Space: When enabled (default), dIKta.me automatically adds a single white space after your dictated text. This allows you to immediately continue dictating the next sentence without manually hitting the Spacebar.
- Additional Key: You can instruct dIKta.me to simulate a keyboard press immediately after injecting the text. Useful options include:
Enter/Return: Perfect for dictating chat messages and sending them instantly.Tab: Useful for navigating spreadsheets or forms.
Dictation Presets (Customizing Modes)
You are not limited to a single dictation style! Using Dictation Modes, you can create multiple custom Presets (e.g., "Standard", "Code Comments", "Medical Jargon") and quickly switch between them using the dropdown in the Control Panel.
This allows you to change your AI's behavior and formatting rules instantly depending on what you are working on.
See the Dictation Modes Settings guide for full instructions on creating, editing, and managing your custom presets.